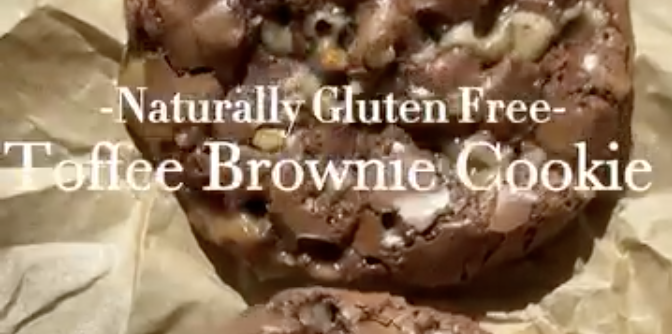
Gluten-Free Toffee Brownie Cookie Bites That Taste Like the Real Thing
If you’ve ever served a gluten-free dessert and watched someone take that first careful bite, you know the look. The polite nod. The quiet “Oh, that’s good” that could mean anything.
These gluten-free toffee brownie cookie bites skip all that. They’re chewy, fudgy, and just a little dramatic in the best way. The kind of cookie that disappears from the plate while people “just grab one more.” And the best part, they’re naturally gluten-free, so there’s no weird flour blend taste hanging around.
I make these when I want big brownie flavor, a cookie shape, and zero fuss. They come together fast, bake up rich, and yes, they might look a little quirky at first. I’ll show you the easy fix for that too.
Jump to RecipeWhy These Cookies Fool Everyone (In a Good Way)
A cookie can be gluten-free and still feel like a full-on treat. That’s the point here. I want you to pull these out of the oven and feel confident setting them down for anyone, gluten-free or not.
The Secret Is That They’re Naturally Gluten-Free
There’s something extra satisfying about a dessert that’s naturally gluten-free, no special swaps required. It’s just a solid, good recipe that happens to fit.
And because of that, nobody’s hunting for what’s “different.” They’re just eating. That’s the goal.
That Chewy, Fudgy Deliciousness Is the Whole Point
These land right in that perfect in-between. Not cakey. Not crisp. Just dense brownie energy with a chewy cookie bite.
Think shiny tops, soft middles, and that deep chocolate pull when you break one open. Then little hits of toffee sweetness tucked in. Simple, but intense.
This Recipe Moves Fast, So Get Your Pan Ready
Some recipes take their time. This one doesn’t.
I like cookies that reward you quickly. Mix, scoop, bake, done. No long chilling, no fancy tools, no big production. If you’re already in the kitchen, you’re halfway there.
It Comes Together in Mere Minutes
This is the kind of recipe I reach for when I want something warm and impressive without turning the whole day into a baking project.
A few reasons it feels so easy:
- Quick mix: It’s a straightforward stir-together situation.
- No complicated shaping: Scoop, bake, and tidy them up after.
- Fast payoff: You’re eating warm cookies before you can talk yourself out of it.
Keep the Scoop Size Small
I know it’s tempting to go big. Big cookies feel generous. But with these, small is better.
A small scoop bakes more evenly and gives you that brownie-cookie texture without spreading into one giant sheet-pan situation. You’ll also get more cute little bites, which somehow makes them disappear even faster.
Don’t Skip Buttering the Sheet Pan (They’ll Stick)
This is the one place I’m not flexible.
Butter Your Sheet Pan, It Really Matters
They will stick if you don’t butter it. Not might. Will.
These cookies are fudgy and rich, which is exactly why they cling. So I butter the sheet pan before I do anything else. I want the bottoms to lift clean, and I don’t want to lose half the cookie to the pan.
Why Butter Works Best Here
A buttered surface creates that thin, reliable barrier. It helps the cookies release without tearing, and it keeps the bottoms from turning into a heartbreak situation.
What Kind of Butter Should You Use?
Whatever you keep in the fridge is fine. I usually grab unsalted, but the main thing is coverage. Don’t be shy with it.
Expect a “Rustic” Look, Then Fix It in Seconds
These aren’t the cookies that come out of the oven looking picture-perfect. And I love them anyway.
They Might Look a Little Funky After Baking
They bake up with personality. Some spread a bit. Some look uneven around the edges. It’s not a flaw, it’s just how a gooey, brownie-style cookie behaves.
And if you’re serving them to guests, or you just like a tidy tray, there’s an easy trick.
Use a Cookie Cutter to Make Them Cute
This is my favorite little move: just use a cookie cutter.
While the cookies are still warm, I take a round cutter and gently scoot the edges into shape. It’s quick, it’s satisfying, and it turns “rustic” into bakery-style in about two seconds.
Picking the Right Cookie Cutter
I keep it simple and use a round cutter that’s a little bigger than the cookie. Round makes them look classic, and it works even if the edges are uneven.
Quick Steps to Shape Them
- Let the cookies cool just a bit so they don’t tear.
- Set the cookie cutter over the cookie.
- Nudge and swirl gently to round out the edges.
That’s it. Suddenly you’ve got that cutest little brown cookie shape on the pan.
The Final Bite Is Rich, Sweet, and Totally Addictive
Once they’re shaped and set, these cookies look like they came from a fancy case. But they still feel homemade, warm, and real.
That Toffee Brownie Flavor Hits Every Time
This is the part where people stop talking mid-sentence because they’re chewing. Deep chocolate. Fudgy middle. And little toffee pops that make every bite interesting.
I call them mind-blowing because they don’t taste like a compromise. They taste like dessert.
A Few First-Timer Tips So Yours Turn Out Right
If this is your first time making them, you’re going to be fine. Just keep a couple things in mind.
The Two Mistakes I See Most
- Forgetting to butter the pan, then fighting the cookies to get them off.
- Scooping too much dough, then losing that perfect texture.
Make Them Yours, Without Overthinking It
If you want to keep it classic, do that. If you want more toffee, do that too. The base idea is simple and forgiving, which is exactly how I like my everyday baking.
You’ve Got to Try These
If you want a dessert that tastes like a brownie and eats like a cookie, this is it. Warm, chewy, and quietly sneaky in the best way.
Make a batch, butter that pan, and don’t stress the funky shapes because you’ve got the cookie cutter trick in your pocket. When you take that first bite and get the full fudgy hit, you’ll know.
If you bake them, I want to hear how fast they disappear in your house.
Gluten-Free Toffee Brownie Cookie Bites That Taste Like the Real Thing
Course: Recipes3
servings20
minutes15
minutes300
kcalIngredients
350 g powdered sugar (just under 3 cups — or use 3 cups, this recipe is forgiving)
1 Tbsp tapioca starch
1 Tbsp Greek yogurt
55 g cocoa powder (8–10 Tbsp) — use 60 g if you like them sweeter
½ tsp salt
2 egg whites + 1 whole egg
¼ cup semisweet chocolate chips
¼ cup milk chocolate chips
½ cup toffee bits (for sprinkling on top)
1 tsp instant coffee (½ tsp if caffeine sensitive)
1 tsp vanilla bean paste
Butter or oil, for greasing parchment
Directions
- Preheat oven to 350°F (175°C). Line a baking sheet with parchment and lightly butter so cookies don’t stick.
- In a large bowl, mix powdered sugar, tapioca starch, cocoa, salt, eggs, coffee, and vanilla until thick and glossy.
- Fold in chocolate chips.
- Scoop 1-2 Tbsp of batter per cookie onto the sheet. Leave 4–5 inches between (they spread a lot).
- Sprinkle each cookie generously with toffee bits. Bake only 6 cookies per sheet for best results.
- Bake 10–12 minutes. Test your oven—reduce time if you want them extra gooey.
- While hot, use a round cookie cutter or small bowl to swirl and shape cookies into perfect circles.
- Transfer to a wire rack and cool completely before eating.
Notes
- Add a pinch of flaky sea salt on top with the toffee before baking for that chef’s kiss finish.